Mar 14

A creative kitchen


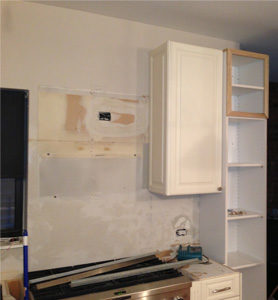
A few months ago I got a call from a potential client. They took a truly creative approach to buying and installing a new kitchen for their north side condominium. This couple bought an entire kitchen, including the granite and appliances from a house in Winnetka that was being remodeled. When I arrived at their house to talk to them, their original kitchen had been removed and their kitchen and living room were filled with cabinets and appliances. We quickly agreed to work together and the real fun began.


The salvage company that sold them the kitchen assured them that the most important parts of the kitchen; the refrigerator, sink and dishwasher would all fit in the existing wall space. As soon as I took measurements, I realized they wouldn’t. So we removed a wall to give ourselves an extra eight inches of wall space for cabinets and appliances.

We started with the base cabinets and appliances because those had to fit in a specific way. There were way more upper cabinets than we could ever use, so we waited to figure out what to use and where to put them until after everything was installed on the floor.

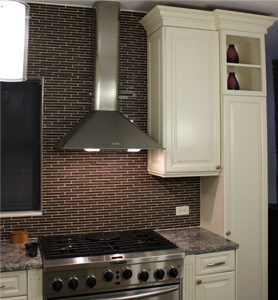
The walls and floors of this building were completely cockeyed. The ceiling height varied in a nine foot span by three inches. Notice that the crown molding does not go to the ceiling.

This approach is not for everyone. My clients took the opposite approach of most people. They bought everything before they even knew whether it was going to work. They ripped out their whole kitchen and lived without one for a few weeks. They were willing to be creative and flexible, and to figure out with me how to make the space a success.

Apr 13

All about shower remodeling in Chicago

In the eighties and nineties, it was considered the height of luxury in the master bathroom to build in a large whirlpool tub. Over the years people have come to realize that they are almost never used and they take up an awful lot of space. Now that we’re moving from the decadent nineties to the practical teens, there’s a surge in people interested in turning their tubs into showers. It’s certainly makes sense. Most people shower every day and take a bath two or three times a year.

Before you start there are some serious considerations to think about. The best place to start is with space planning. When you look at all the pictures in magazines or websites, the master bath is the size of your whole apartment. Many of us who live in a city use a bathroom that is about six feet by ten feet or smaller. So you’re not adding a massive shower to your bath. You’re taking out the tub and converting the space to a shower. In order to be comfortable in the new space, you should have at least thirty inches of width in your shower. Any narrower and it will be uncomfortable. Fortunately, standard tubs are thirty inches wide, so most baths have the space. You also should have at least eighty inches of ceiling height. That’s less than seven feet, and you can’t get by with less than that. If you’re putting a door in the shower, measure the space between your toilet or vanity and where the shower will go and make sure you have enough space to place a door. The minimum width door you will want is about twenty four inches wide, so if you have only a four foot tub (which is rare but I’ve seen many of them in old buildings), you won’t have room to open the door. You should thoroughly think about how the new space will look and what’s important to you in the shower. Is it critical to have lots of shelf space so there’s plenty of room for shampoo and soap? Would you like a bench so you can put your legs up on it to shave? Do you want to install a steam shower because you feel chilled to the bone all the time during Chicago winters?

The next step is to call in a pro. In this case I’d recommend a general contractor because this is definitely not a do it yourself project. You will need carpentry, drywall or cement board installation, waterproofing expertise, tile installation, new plumbing, and possibly electric work. First, we are going to double check your measurements and make sure that everything fits. Once that’s done, the fun starts. Everything must go, and the room will be stripped to the studs. The next few steps no one sees but they are most critical. When you read a Houzz or House Beautiful article about shower remodels, they’ll talk about picking tiles and fixtures. Those things are important, but what really counts is building the new shower properly from the ground up. I’ve been involved in six or seven shower disasters when I was called in by people whose issues ranged from leaking showers to the supporting frames underneath rotting away and the shower starting to collapse. Fixing an improperly installed shower costs more than building it right in the first place.

In a nutshell, here’s what now goes into the shower. We either frame out a custom size base, line it with a rubber membrane and fill it with cement or purchase a premade vinyl base that can be your floor or can be tiled (your choice based on esthetics and cost). The plumbing is changed from the tub and shower configuration to shower only. The drain is reworked to function in the space. The most important step in the whole process is to make sure that there is a continuous waterproof barrier from the floor to the ceiling. Expert tile installers do this by using a combination of waterproof boards, rubber membrane and waterproof epoxies. If this step is not done right, you will eventually have leaks. Next we tile and put on the shower fixtures. Finally the glass goes on and you have a new shower.

Your esthetic choices are important. I want you to pick beautiful fixtures, have a great rain shower head, select gorgeous tile, and have storage space for all your stuff. But even more I don’t want you to have nightmares after you build your new shower. Have fun!

Jul 4

Green building and renovation: what it is and how come all the trade magazines talk about it in every issue but no one else does

Green building usually refers to several related things:

  • Site planning and building layout mainly in new construction to make the absolute most efficient use of location and materials so a building can use as little energy as possible. This is called passive energy design.
  • Aggressive use of insulation, capture of rainwater, solar panels and other active systems to utilize energy so efficiently that a building actually generates more energy than it uses. These approaches use active systems and designs. When you hear about the LEED (Leadership in Energy and Environmental Design) Platinum designation for extremely energy efficient buildings, these almost all use active design in addition to passive.
  • Some companies and consumers are devoted to using products that produce little or no VOC’s (volatile organic compounds). Everything that is used for construction is composed of organic compounds and many of these are considered volatile. Volatility in and of itself is not bad, but it does mean that the material has a low boiling point and molecules will evaporate into the air after installation. And some VOC’s are definitely not healthy for us. Paint is the largest source in buildings, and manufacturers have reformulated their product so almost every paint sold today is low VOC. Synthetic carpets also emit VOC’s.

In broad terms, these are the three approaches that comprise green building. I subscribe to about 6 trade magazines and every issue features articles on green building. They usually show a home that produces energy. They have low flow shower heads, toilets that only flush half the water of a normal toilet, there are solar panels on the roof, and the building envelope is so tight that they need to use air exchangers to pump fresh air in from outside. How come you’ve never seen a house like this? They cost a lot more to build and the payback for your initial investment is many years. I read a very interesting article last year. Unfortunately, I can’t remember where. It basically said that consumers are willing to pay 3% more for a house with green features. Now go to Custom Home magazine’s website and do a search for articles on green building. You’ll find 1901 articles. Why the disconnect? Everyone wants to be green, but very few of us are willing to sacrifice anything just to be altruistic. I’ve been involved in a number of new construction and renovation projects that sold for over $1,000,000. And it shocks me to say that I’ve never had one person ask me anything about the green features that were part of the project. But don’t despair. This is a trend whose time is coming. Most people in the building business do want to improve construction quality and lower energy use. As the technologies and materials are more widely adapted by those of us who make construction decisions, the cost is coming down. And the good news is that we can achieve 80% of the benefits of LEED Platinum building without a major expense in construction.

Apr 1

Most everything you need to know about kitchen cabinets


Kitchen cabinets are complicated. Whether you go to Home Depot or Christopher Peacock, when the sales associate starts telling you stuff that you can’t understand, it seems impossible to make an informed decision. So here are seven things you need to know before you walk in to look at cabinets.

  • Box construction.  This is the heart of the cabinet. Most cabinets are made from particle board.  The best cabinets are made from thick, furniture grade plywood.  When someone tells you the cabinets are solid wood, they mean plywood.  But the critical element is not which material is used.  It’s what quality of the material is chosen and, most important, how well made the box is.  Very few of the least expensive cabinets have all four sides aligned properly.  The carpenter has to make them look right when installing them.  In most cases, the difference in cost between different cabinet manufacturers is based more on the features offered than any cost difference in box materials.
  • Framed versus frameless cabinets.  Framed just means that there is a frame that outlines the cabinet box and divides the cabinet  If the box is wide enough for two doors, the frame will divide the two doors.  Frameless construction, as the name implies, doesn’t frame the door.  Frameless cabinets offer a more contemporary look and it’s a little easier to put dishes away in frameless cabinets, but one style is not inherently superior to the other.
  • Frame styles with doors.  Full overlay doors cover the entire face frame — or the entire box front on frameless cabinetry — leaving only a sliver of space between doors and drawers.  With partial-overlay cabinets, the doors cover the face frame by half an inch, and the frame shows all the way around the door.  Full-inset cabinets have drawers and doors that fit flush with the face frame. Because this technique requires patience and precision during construction, full inset is usually available only in custom cabinetry.
  • The hinges that hold the doors to the cabinet should not matter to you.  The manufacturer is going to use the appropriate hinge for the cabinet and door style.  Make sure you get a soft close hinge because they protect the doors from slamming and they are kind of cool.
  • Drawers.    The best quality drawers are solid wood, dovetail (joined with overlapping, interlocked tenons) construction with full extension, undermount glides. They use either a nylon or metal ball bearing to control the glide. High-quality drawers also close softly like cabinet doors.
  • Cabinet finishes can be natural, stained, painted or glazed (first painted then stained to add highlights and soften the color).  The price goes up in the order of the options I just listed.
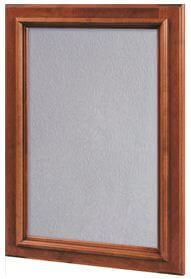
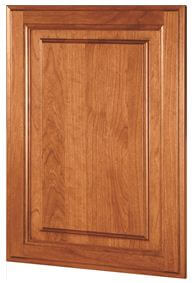
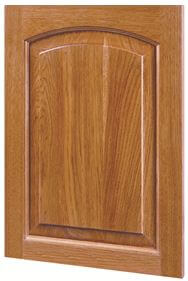
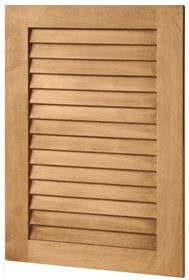
  • Doors are the most confusing.  They can be described as slab, mitred, solid panel, veneered panel, plank, raised panel, frame only, inset, rabbeted, overlay.  To make matters worse, doors can have two or three of these features.  The terminology is so confusing that pictures work best to show you the different kinds of doors.  
 
A plank door 


 A slab door
 

A frame only, mitred door (there is a 45 degree angle
 where the corners meet).
 

A flat panel veneer door. The panel is a quarter of an inch thick, so it’s considered veneer. The panel is recessed in from the exterior frame. Notice that this door has the stiles, the vertical pieces on the sides, laid next to each other, not mitred at 90 degree angles.
 

A raised panel door. The panel in the center of the door is raised and it’s the same thickness as the stiles (the side panels).
 

A louvered door. The louvers allow air into the cabinet.
Sep 16

What to look at when buying a new home Or How to be your own home inspector (at least a little)

At this moment I’m involved with two homes that have expensive problems. They have a number of things in common. Both of them were purchased in the last six months by young couples as a first home after living in a condominium apartment. Both the homes are at least fifty years old. Both the homes were thoroughly inspected by ‘professional’ home inspectors. Both homes have structural issues that will cost more than $25,000 to fix. And the structural issues would definitely have been spotted and flagged by an experienced builder, architect or structural engineer.

What went wrong? In both homes, either the home inspection missed the problems altogether or noted the problems and didn’t raise a red flag so the buyers had no clue it was important. Probably the inspector didn’t realize it either. The majority of home inspectors have some background in building, but don’t understand buildings like engineers or architects. They take a class in inspection, follow a rote approach to each building, and usually issue a lengthy report with lots of pictures to support each comment. As a builder I find their approach to be great at catching lots of minor problems but they are often not equipped in knowledge or method for seeing some serious issues.

So what should you do? I do think you should get a home inspection, flawed as they may be. You want to know if one of the electric outlets doesn’t work or if the furnace is rusting. But I’d urge you, if you’re looking at an older house, a new construction home with no history, or have any reason at all for serious concern, to pay an architect or engineer to come look at the potential purchase. They may charge $500 just to look and give you a verbal report, but it could be the best money you ever spent.

Before you decide to hire a professional, look at the house with a dispassionate eye. Start in the basement and go to the roof. It’s beyond the scope of a blog post to tell you everything to look for, but use common sense. In the basement, is the floor completely level and are there cracks in the floors or walls? Look at the support beams and posts in the basement. If they are wood, are there cracks? Do you smell dampness? Do you see any water stains? Look at the furnace and water heater. Do they look like they’re in good condition? Look at all the floors and walls throughout the house. Are they level? If there are wood floors, are there gaps? Does the drywall on the ceilings look perfect or can you see the tape coming through? Caution- problems in the walls and ceilings can easily be covered by a decent paint job. Look at the windows and doors. Do they all open easily and smoothly? Walk around the outside of the house. Look where the dirt touches the foundation walls. Do you see any cracks in the wall? Look at the brick around the house; make sure the mortar isn’t cracked. Look at the chimney and make sure it’s straight and has no cracks. Look at the shingles on the roof. They should look flat, with no ripples. If you’re buying a house in the city with a flat roof, just assume it needs to be reroofed and will cost at least $15,000.

Since you are already emotionally invested in this home, maybe you should invite a friend to walk through with you. Neither of you is trying to take the place of a professional inspection. Follow your gut. If something doesn’t feel right, call me or call an architect or engineer. The biggest things to look for are water damage and structural issues. The place to really concentrate is the basement. It’s the place most home buyers ignore because they fall in love with the rest of the home, but it’s also the place where you’ll find clues to the most serious problems. Both water issues and structural defects show up here.

People have written books on this subject, so this can only be a brief guide, but I wish I had a dollar for every time a client or friend told me that they hired a home inspector with twenty years experience and can’t understand how they missed this problem. You’re not going to take the place of an engineer, but you can definitely use your eyes and your nose to spot problems that might be major issues. Don’t be intimidated; after all, you’ve lived someplace your whole life, and you know the problems in the places you’ve lived. Now go look at this home and pretend it’s one you’ve lived in. You may find you know just where to look.
Feb 28

Why I’m writing a kitchen bath design build renovation blog about building (or, how I’m learning not to be afraid of social media).

Buildings are something that we all use every day. We live in them, work in them, and play in them. We take all those buildings completely for granted unless something’s not working for us in them. It might be something functional that’s not functioning. When your air conditioning stops working and its 95 degrees outside, you stop taking it for granted. It might be something emotional or aesthetically that’s jarring. If you hate your kitchen, you don’t take it for granted. It bothers you every time you walk in there.

Since we spend most of our lives in them, buildings impact us in every way. They can make us healthier or less healthy, happier or more depressed, bring families together if the design is good or separate them if the design is bad, help or hurt our productivity at work. Few things impact our lives as much as our environment. In a way, the buildings where we live and work have as much emotional and physical influence on us as the people with whom we spend time.

I have a passion for design and construction. I believe strongly that my work makes people’s lives better by making their home or work environment a better place for them to live in. I get just as much psychic satisfaction from fixing a flawed bathroom as in building a multi unit condominium. And the gratification is much more immediate! The best thing for me about my business is that pretty much every job involves improving someone’s life.

I see buildings (and rooms) as living things that have a life cycle. We can extend their lives by surgically intervening and resuscitating their essence. When we make their lives better and longer, we do the same to ours.

I think a lot about all this stuff and I have a lot to say about it. It might interest you. If it does, read my posts and pass them on to your friends and colleagues. You can always write or call me. I enjoy talking about construction and design. I’m happy to look at building problems and design opportunities and give you my thoughts. You can go to my website at www.m5chicago.com to see my work or my Facebook page to send me a message. If you’re not interested in this stuff, just unsubscribe. My feelings won’t be hurt. We’re all bombarded with more information than we can absorb.